How to Create a Shipping Plan ( PO ) for Inbound Inventory
Last updated: February 28, 2026
Overview
Before any inventory arrives at Mountainy, we require a Shipping Plan ( PO ) to be created in your 3PL portal. This gives our receiving team the details needed to prepare for your inbound shipment and receive inventory accurately.
All inbound shipments must also adhere to Mountainy’s Receiving Guidelines. Following these guidelines helps prevent receiving delays, inventory discrepancies, and avoidable rework. If your shipment does not meet the guidelines, receiving may be delayed while issues are corrected and additional fees may apply.
Step 1: Accessing the 3PL Portal
To begin, navigate to the ShipHero client portal:
Go directly to: https://shipsfor.us/account/login/
Sign in using the account credentials provided by your Mountainy account manager.
If you have not received login credentials, please contact the Mountainy team before proceeding.
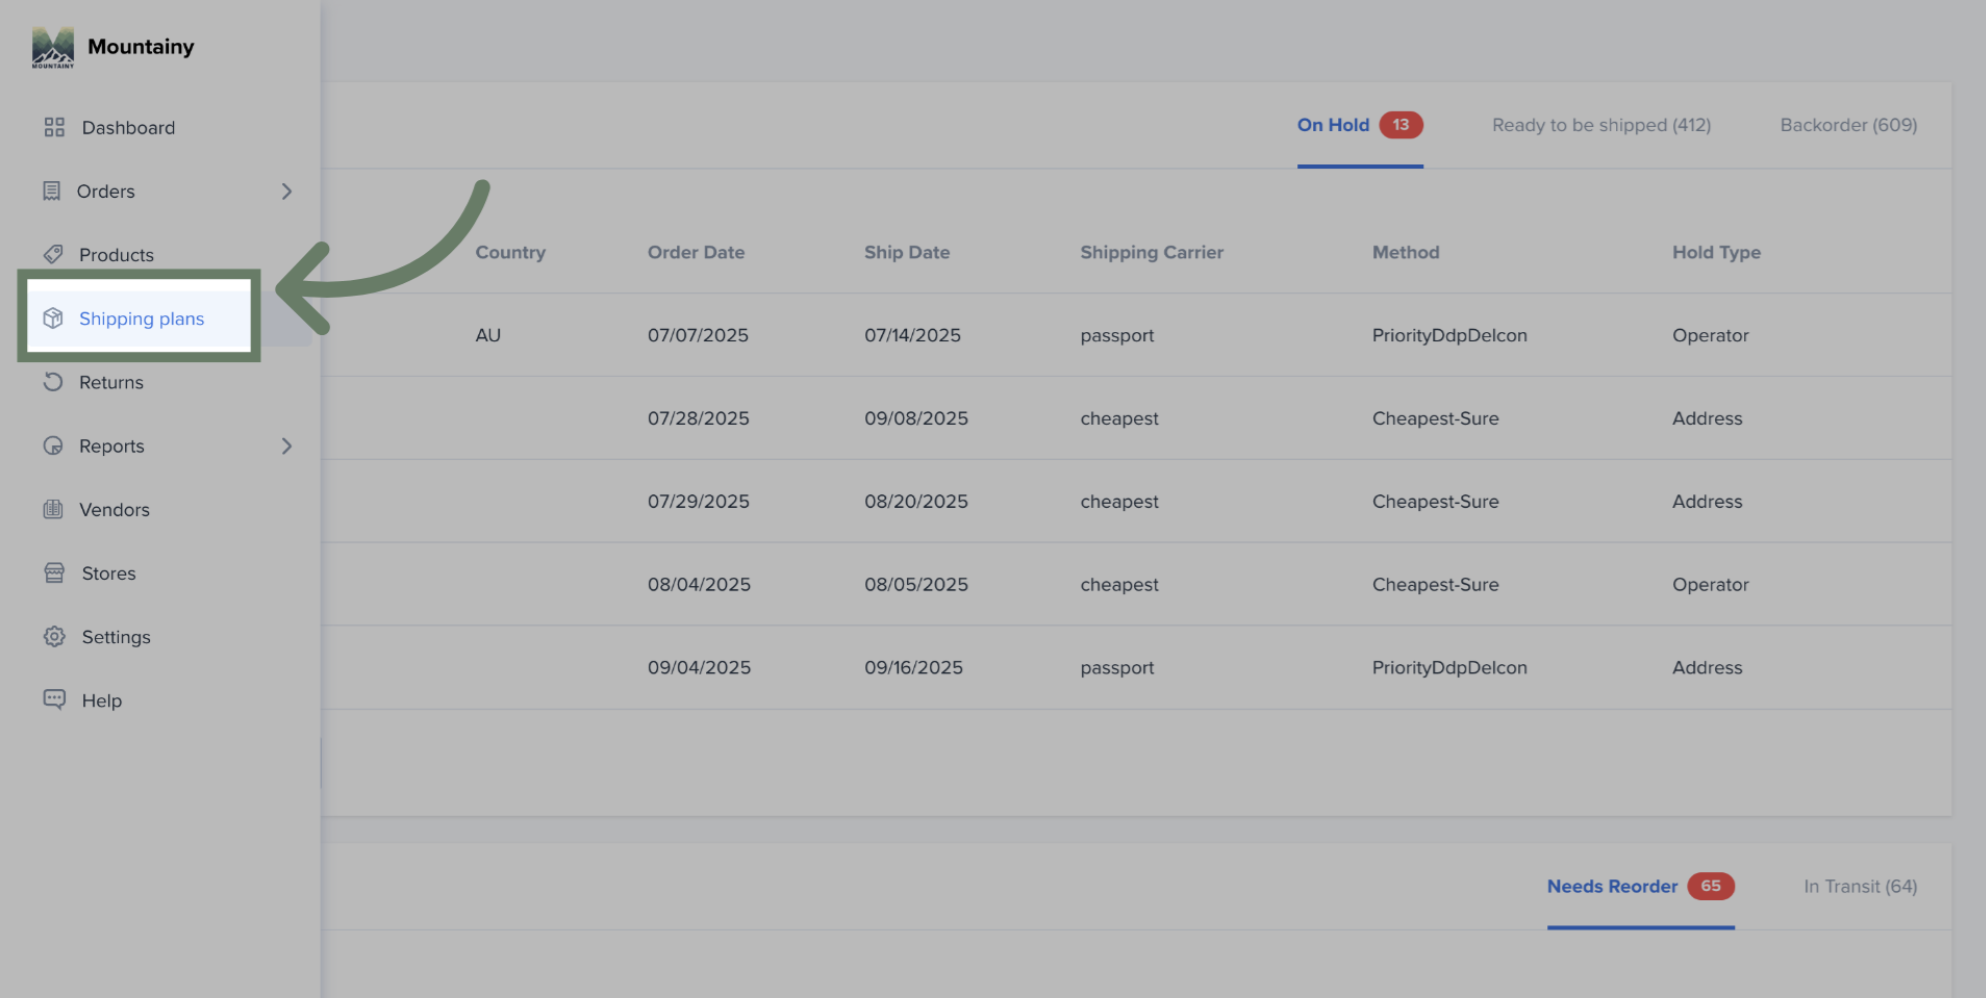
Once logged in, use the left-side navigation menu and select Shipping Plans to begin creating your Purchase Order.
2: Create a Shipping Plan
Once inside the Shipping Plans section:
Click the Create a Shipping Plan button located in the top-right corner of the screen.
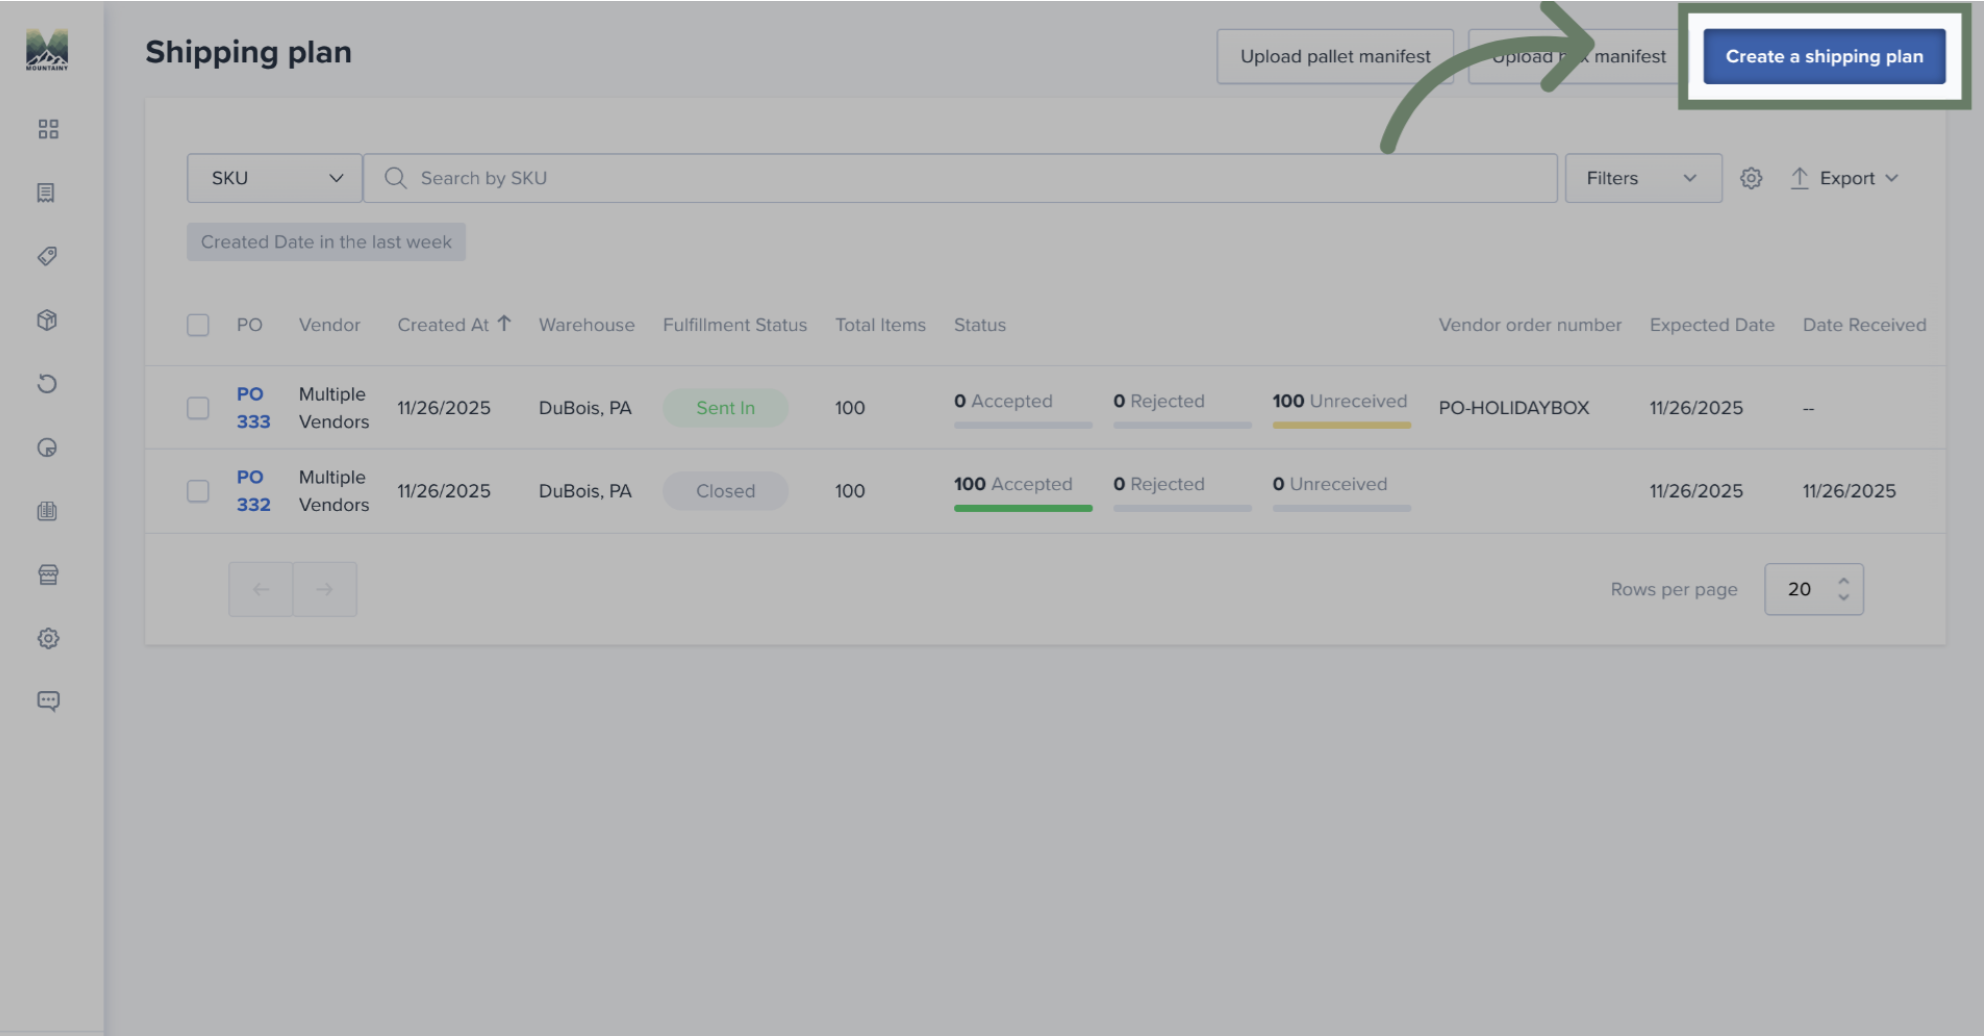
This will open a new Shipping Plan (Purchase Order) form.
2A: Select the Correct Warehouse Location
After clicking “Create a Shipping Plan,” you will be prompted to select the destination warehouse:
Ensure the correct Mountainy warehouse location is selected.
If your brand utilizes multiple warehouse locations, confirm you are choosing the correct facility for this inbound shipment.
Selecting the wrong warehouse location may result in receiving delays, and or receiving discrepancies.
3: Add SKUs and Confirm Quantities
This step is the most important part of the Shipping Plan ( PO ). The SKUs and quantities entered here determine what Mountainy expects to receive and how inventory is added into the system.
3A: Add SKUs
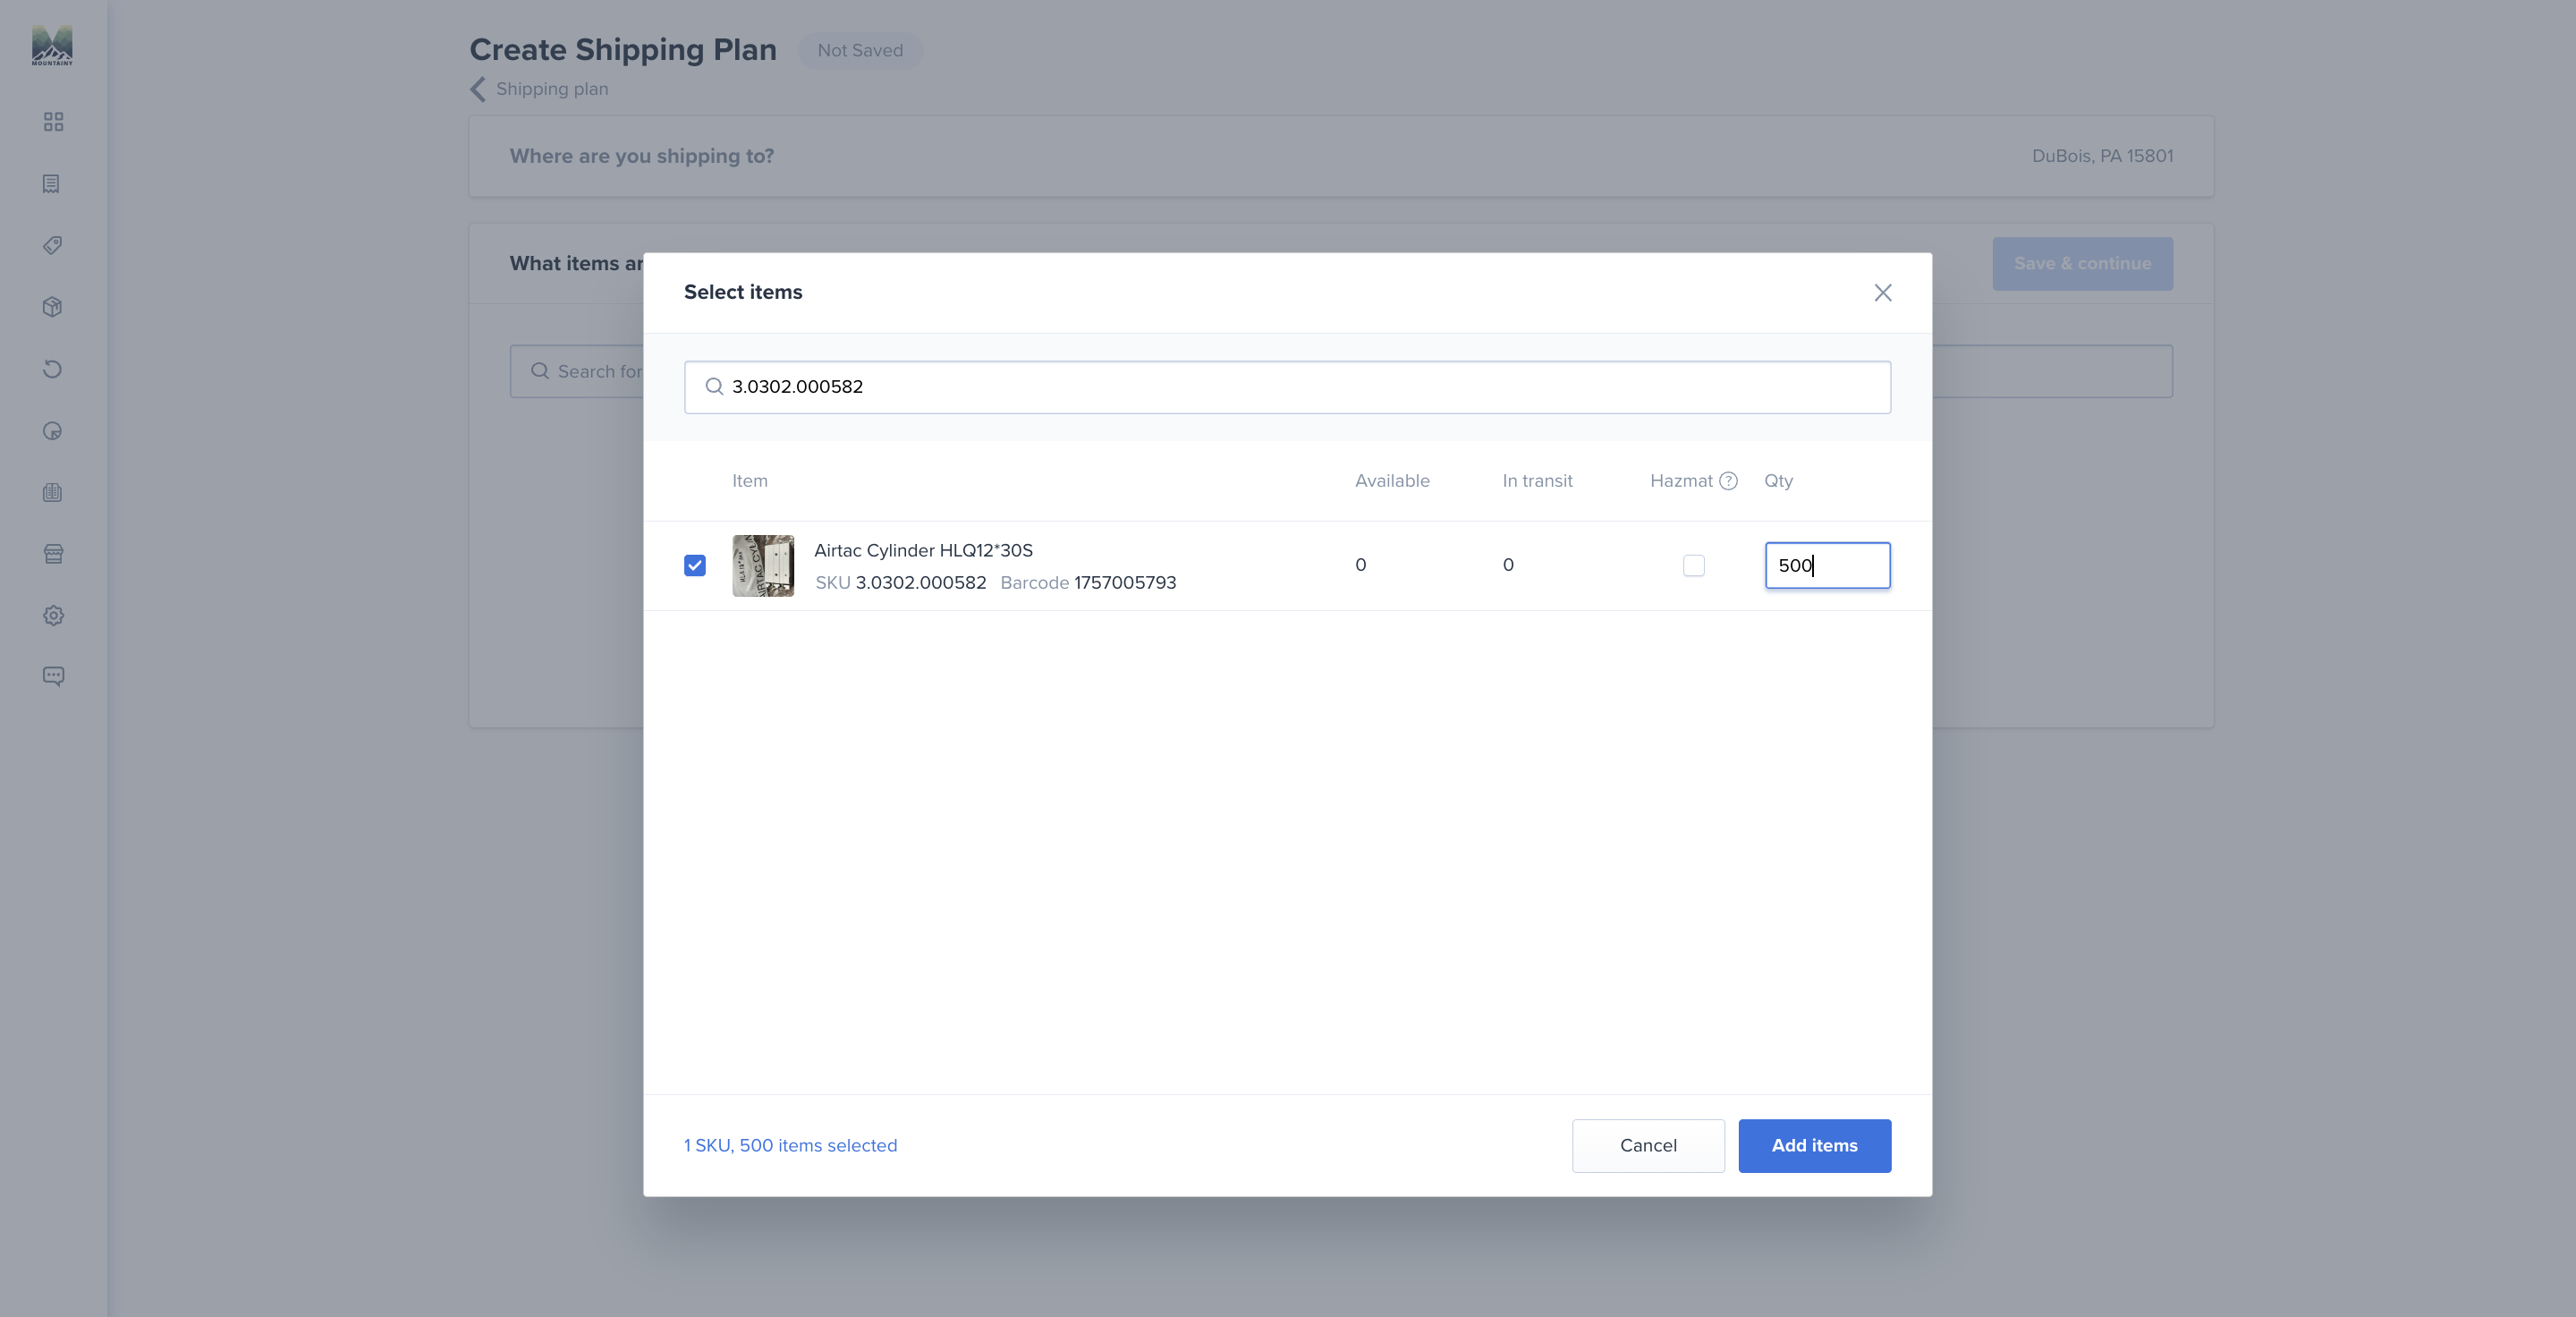
Use the search bar to find each SKU included in the shipment.
Select the SKU to add it to the Shipping Plan.
3B: Adjust Quantities
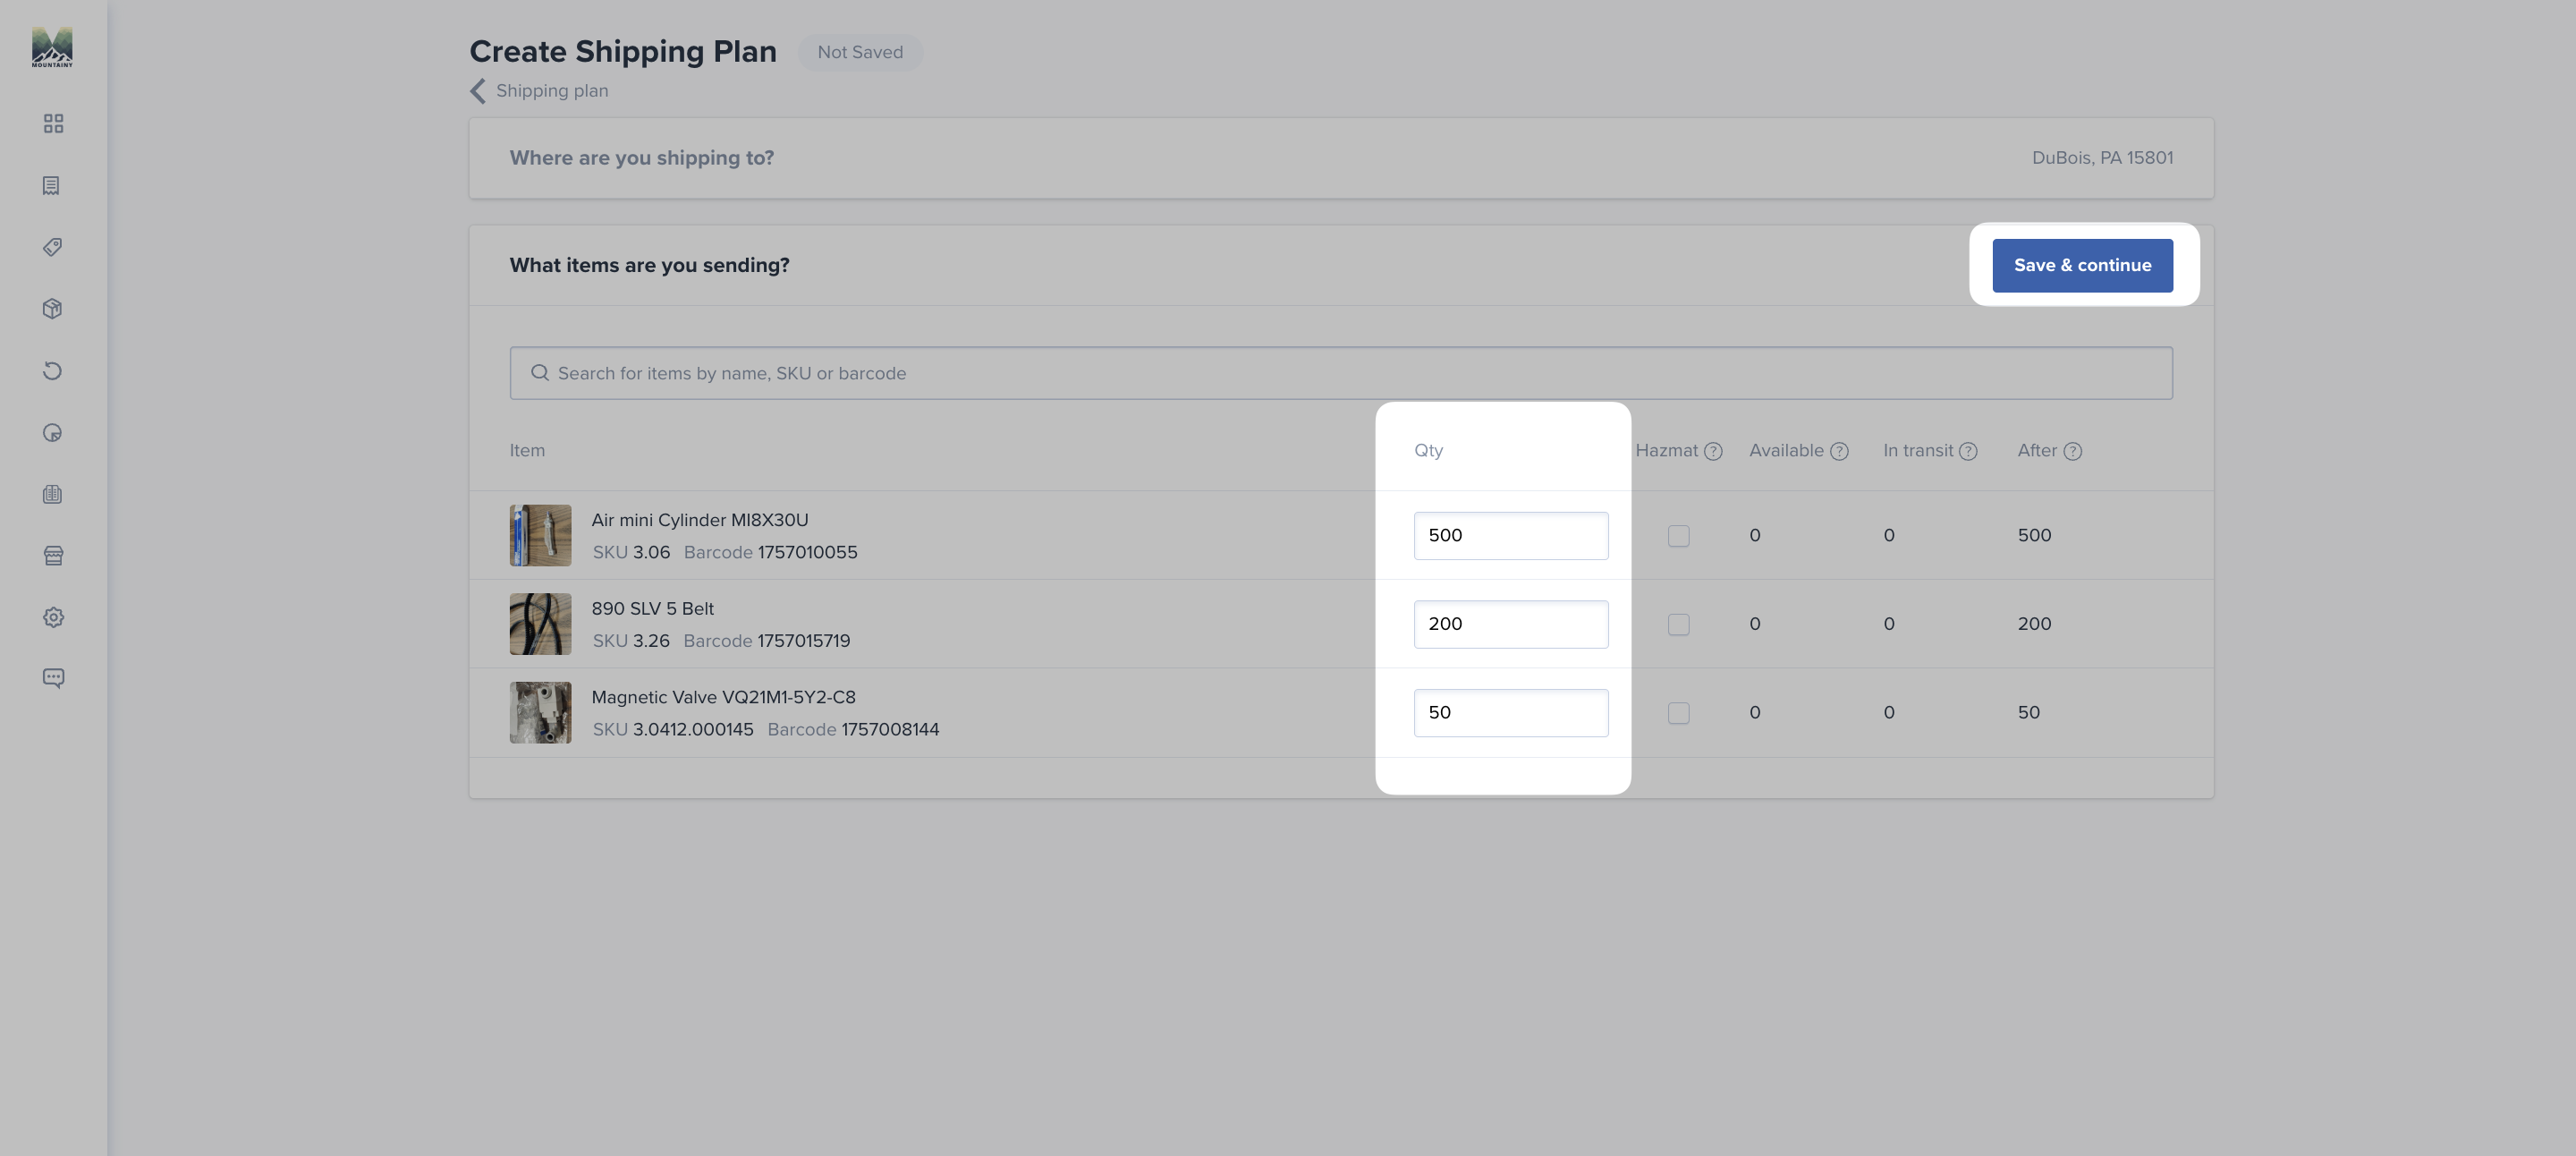
Once SKUs are added, confirm and adjust the quantity for each line item so it matches exactly what is being shipped.
3C: Save Your Changes
After all SKUs have been added and quantities are correct, click Save to lock in the items on the Shipping Plan.
4: Select Packaging Method and Define Carton Details
After saving your SKUs and quantities, you will be prompted to select how the shipment is being packaged.
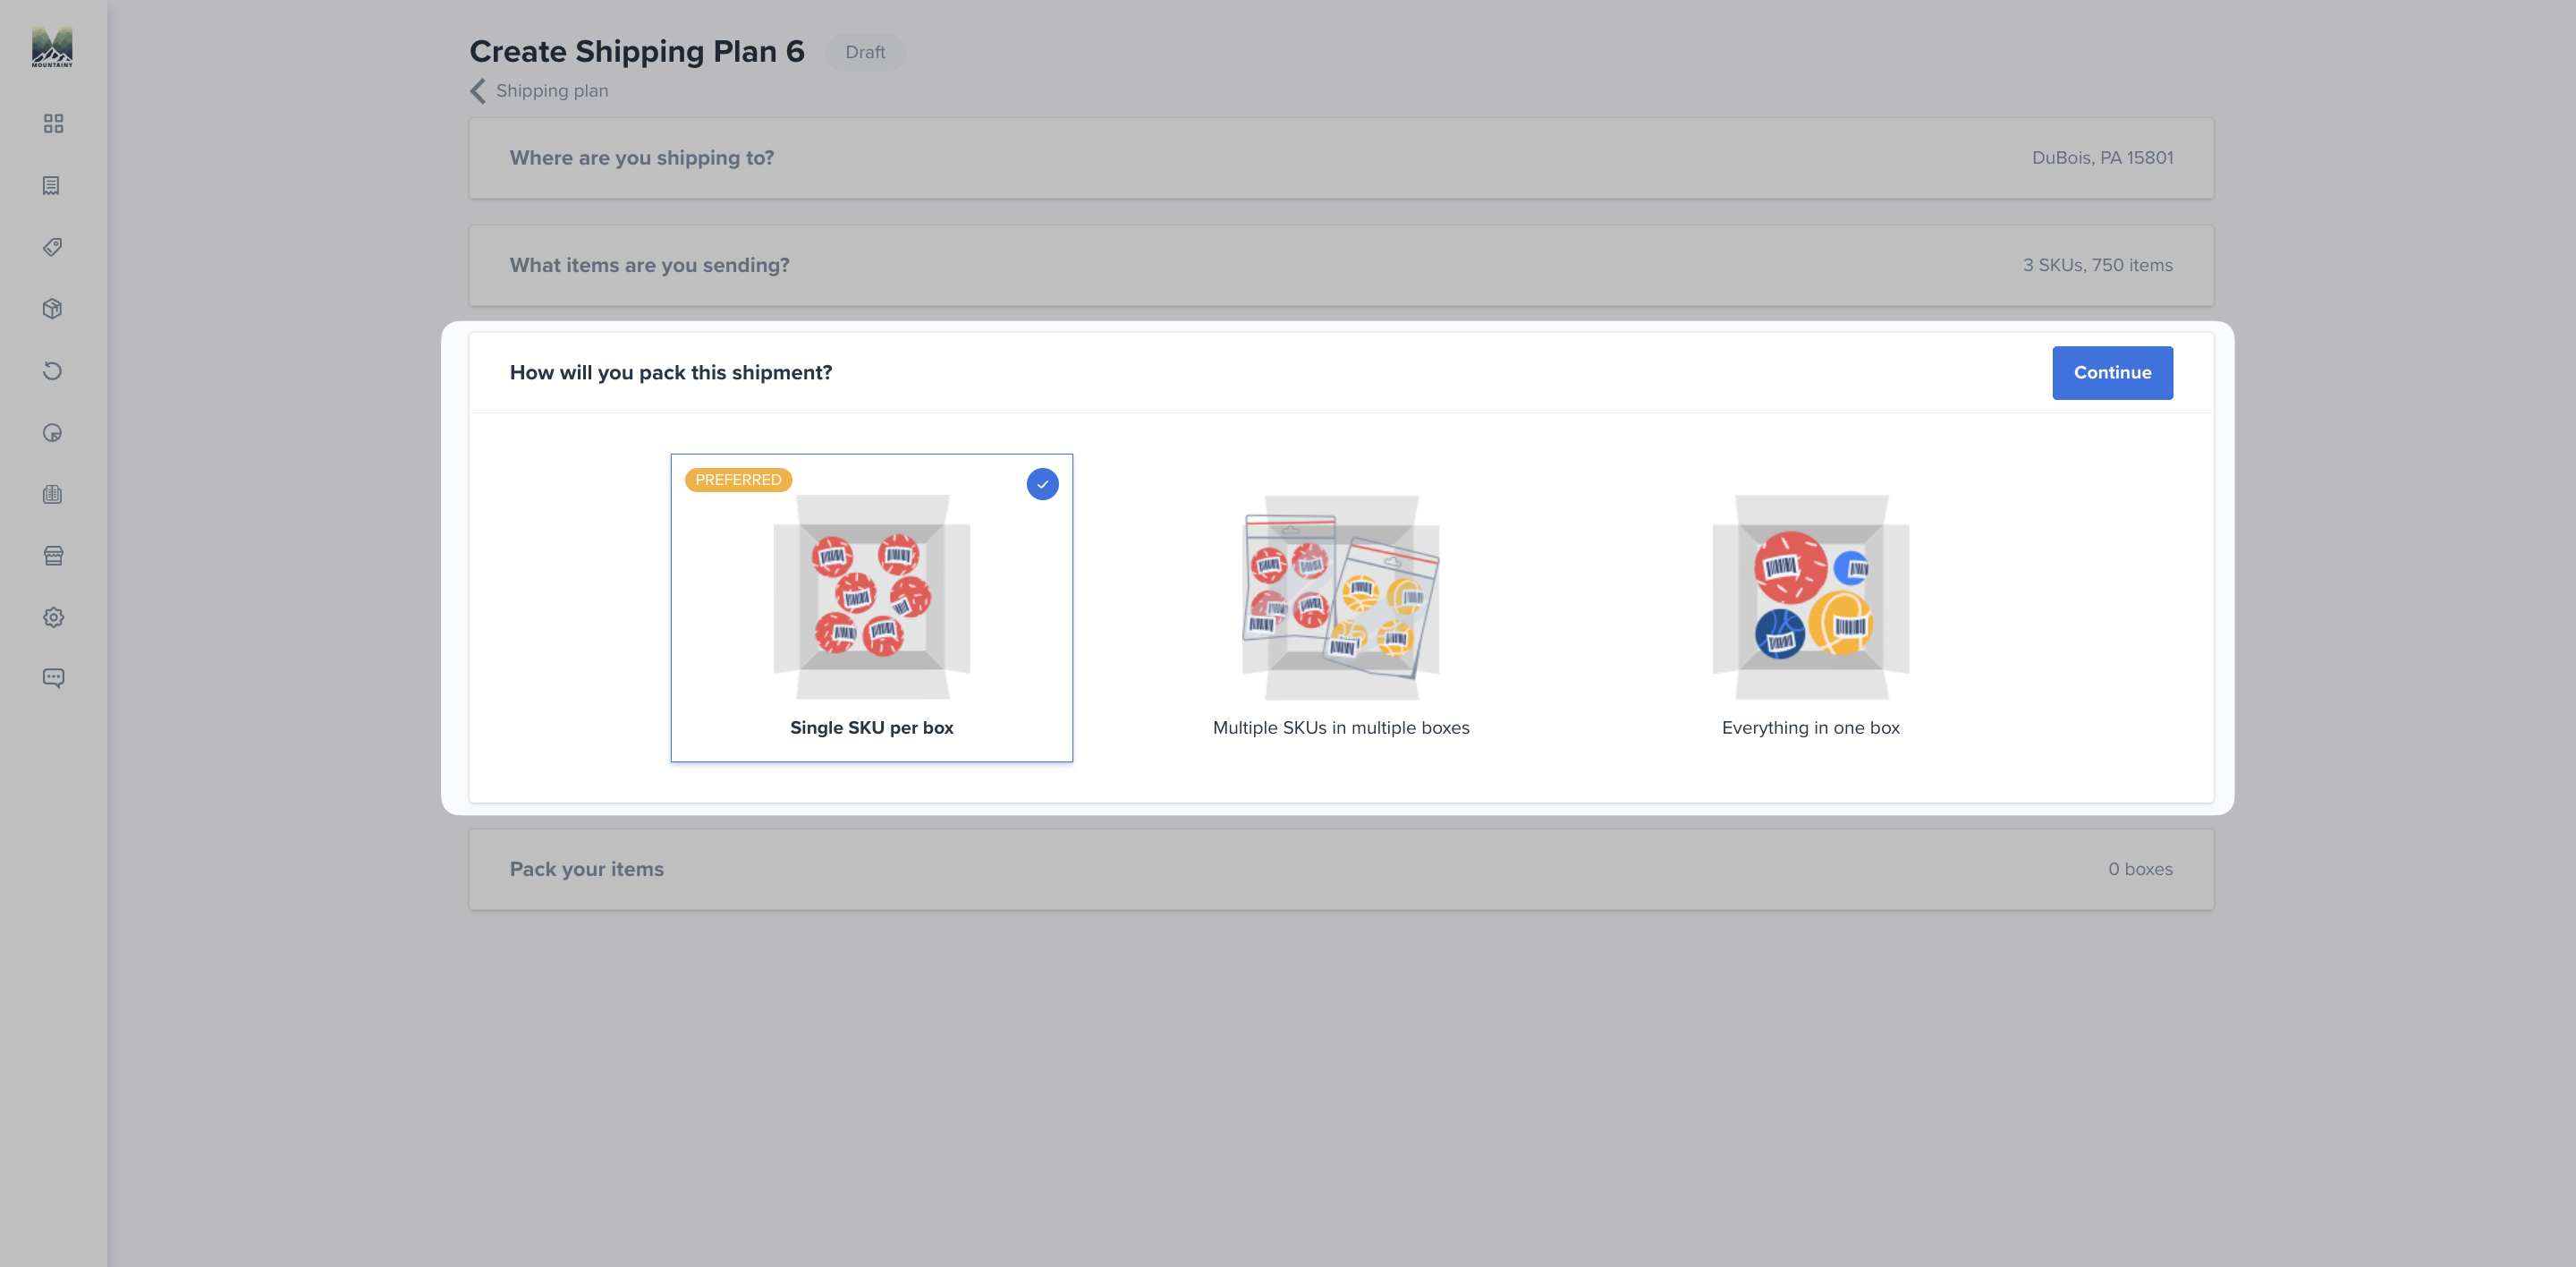
Choose the packaging method that accurately reflects how your inventory is packed. All shipments must follow Mountainy’s Receiving Guidelines.
4A: Specify Units per Box and Total Boxes
You must accurately enter:
The number of units per box
The total number of boxes being shipped
If using master cartons with inner cartons:
Each inner carton must clearly reflect the SKU and unit count.
The quantities entered in the portal must match your supplier’s physical packaging exactly.
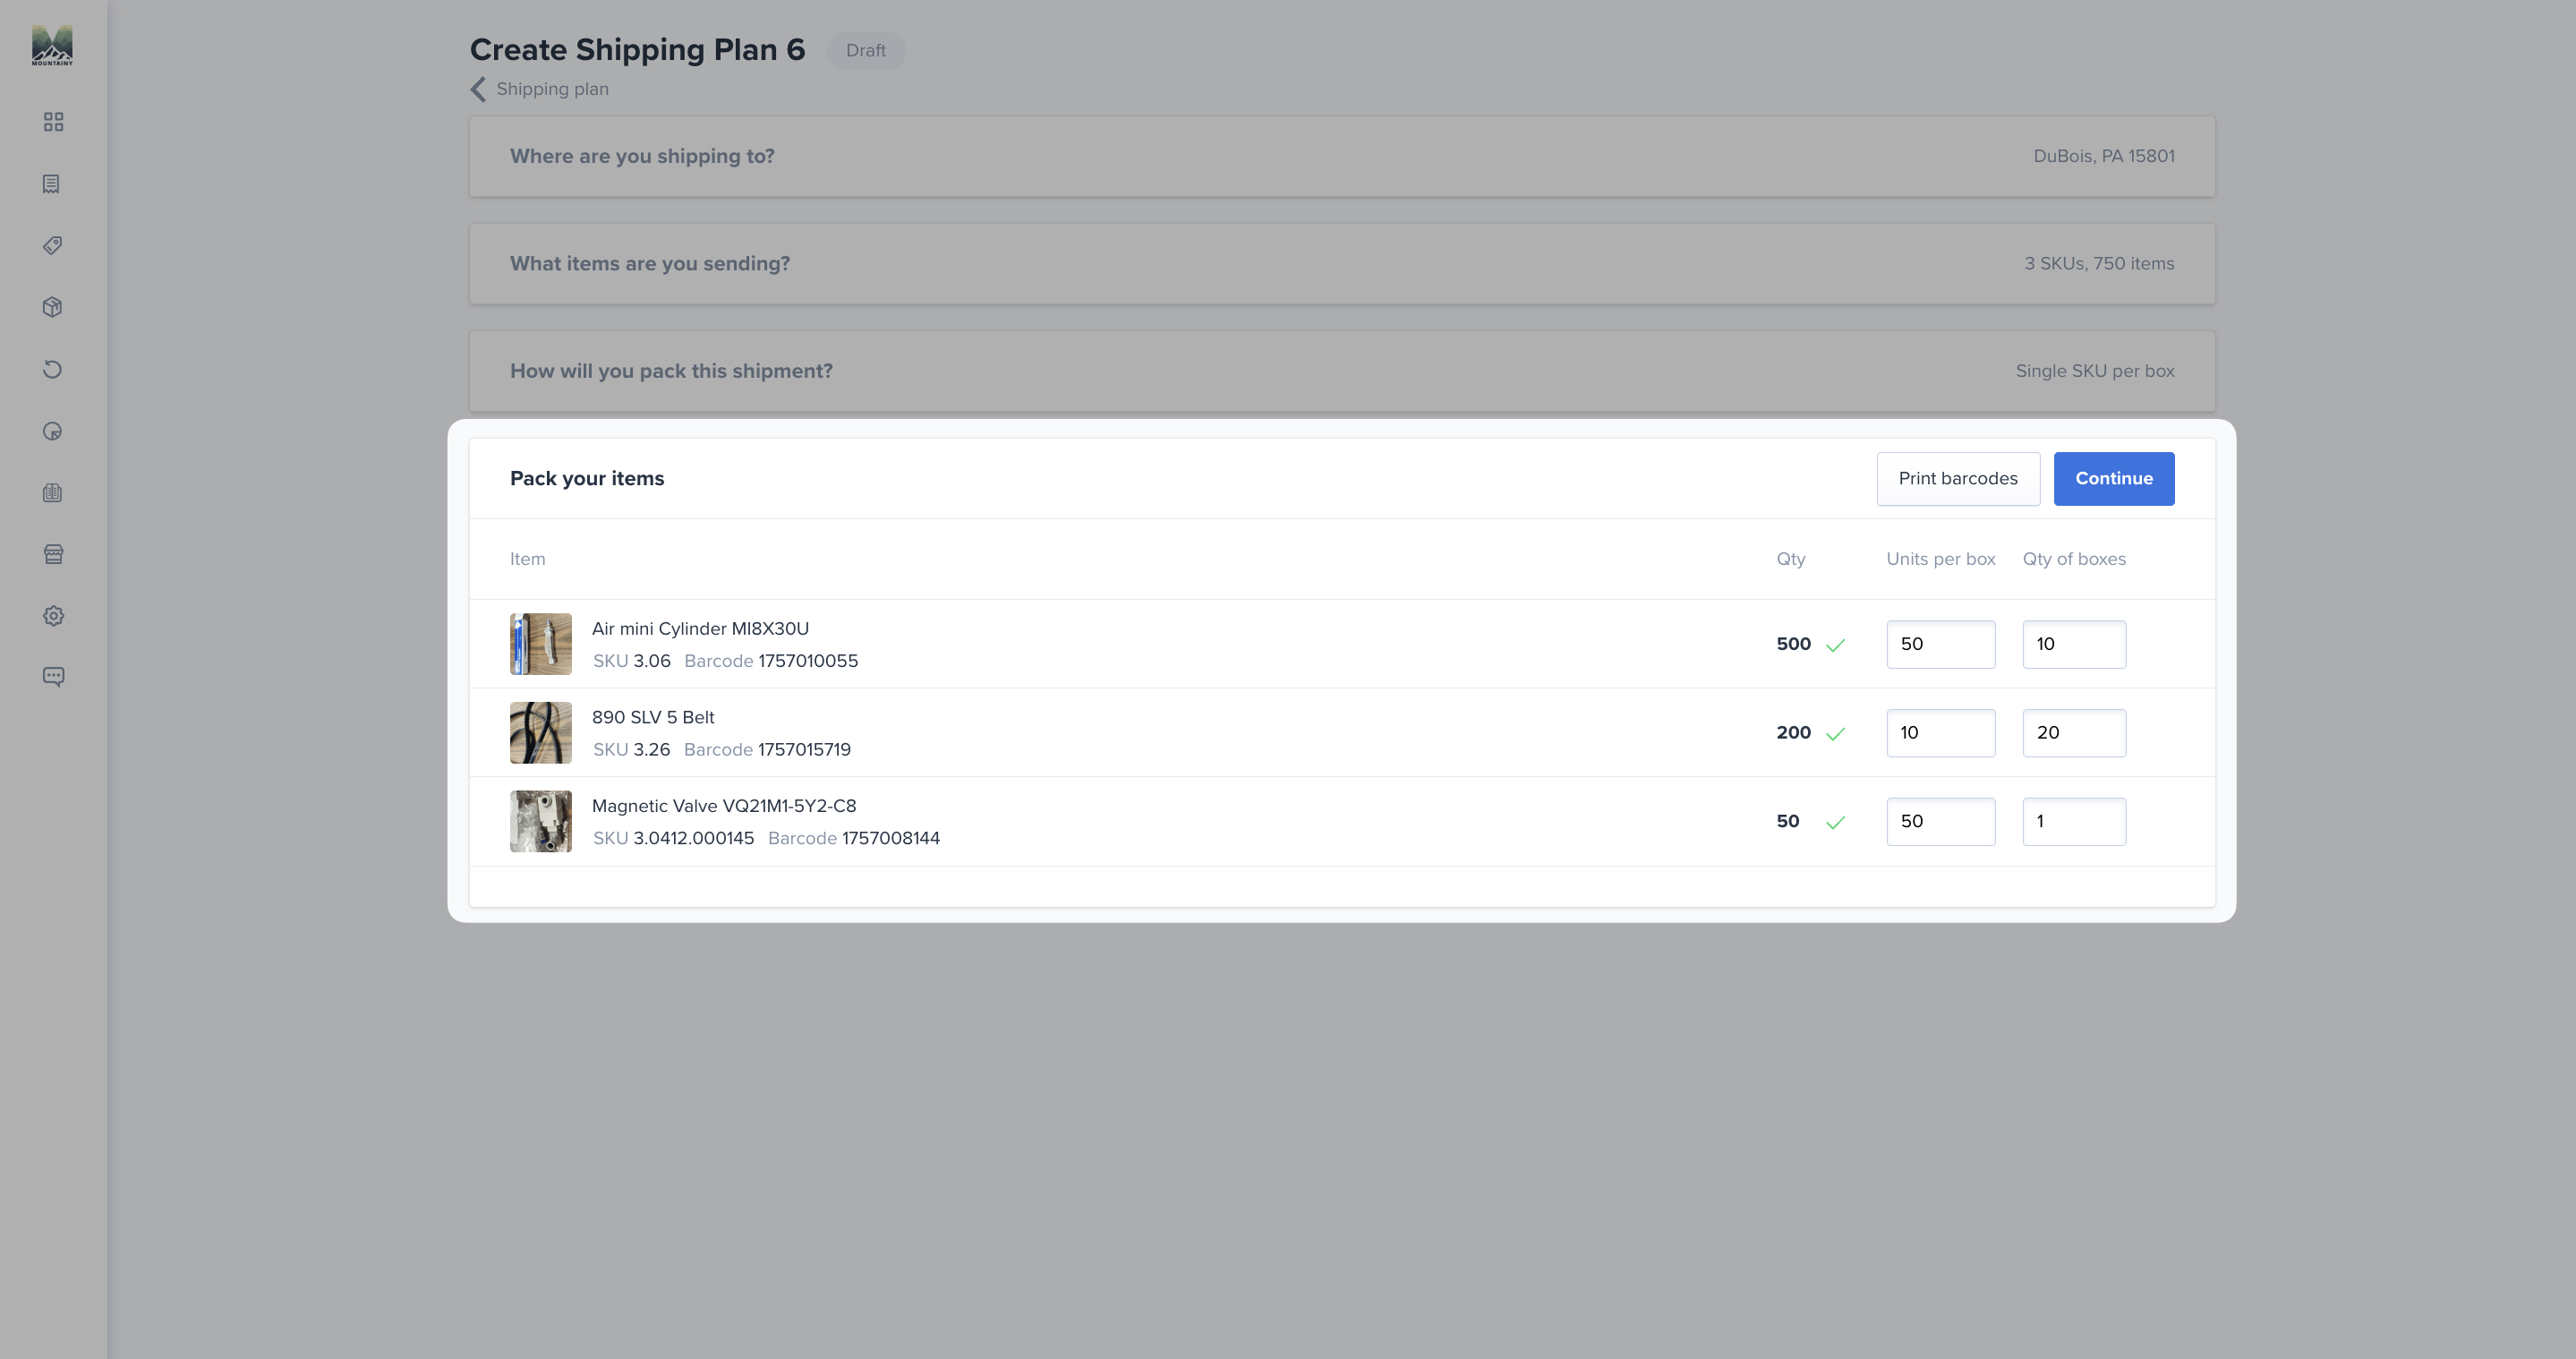
Double-check these numbers before proceeding. Incorrect carton counts or unit quantities are one of the most common causes of receiving discrepancies.
4B: Add Required Shipment Details & Warehouse Notes
Before completing your Shipping Plan, ensure all additional shipment details are entered accurately.
Required Information
The following fields must be completed:
Vendor Order Number
Origin of Shipment
Providing accurate vendor and origin information helps the receiving team verify inbound shipments and coordinate dock scheduling when necessary.
Warehouse Notes (Optional but Recommended)
You may include notes for the warehouse team within the Shipping Plan.
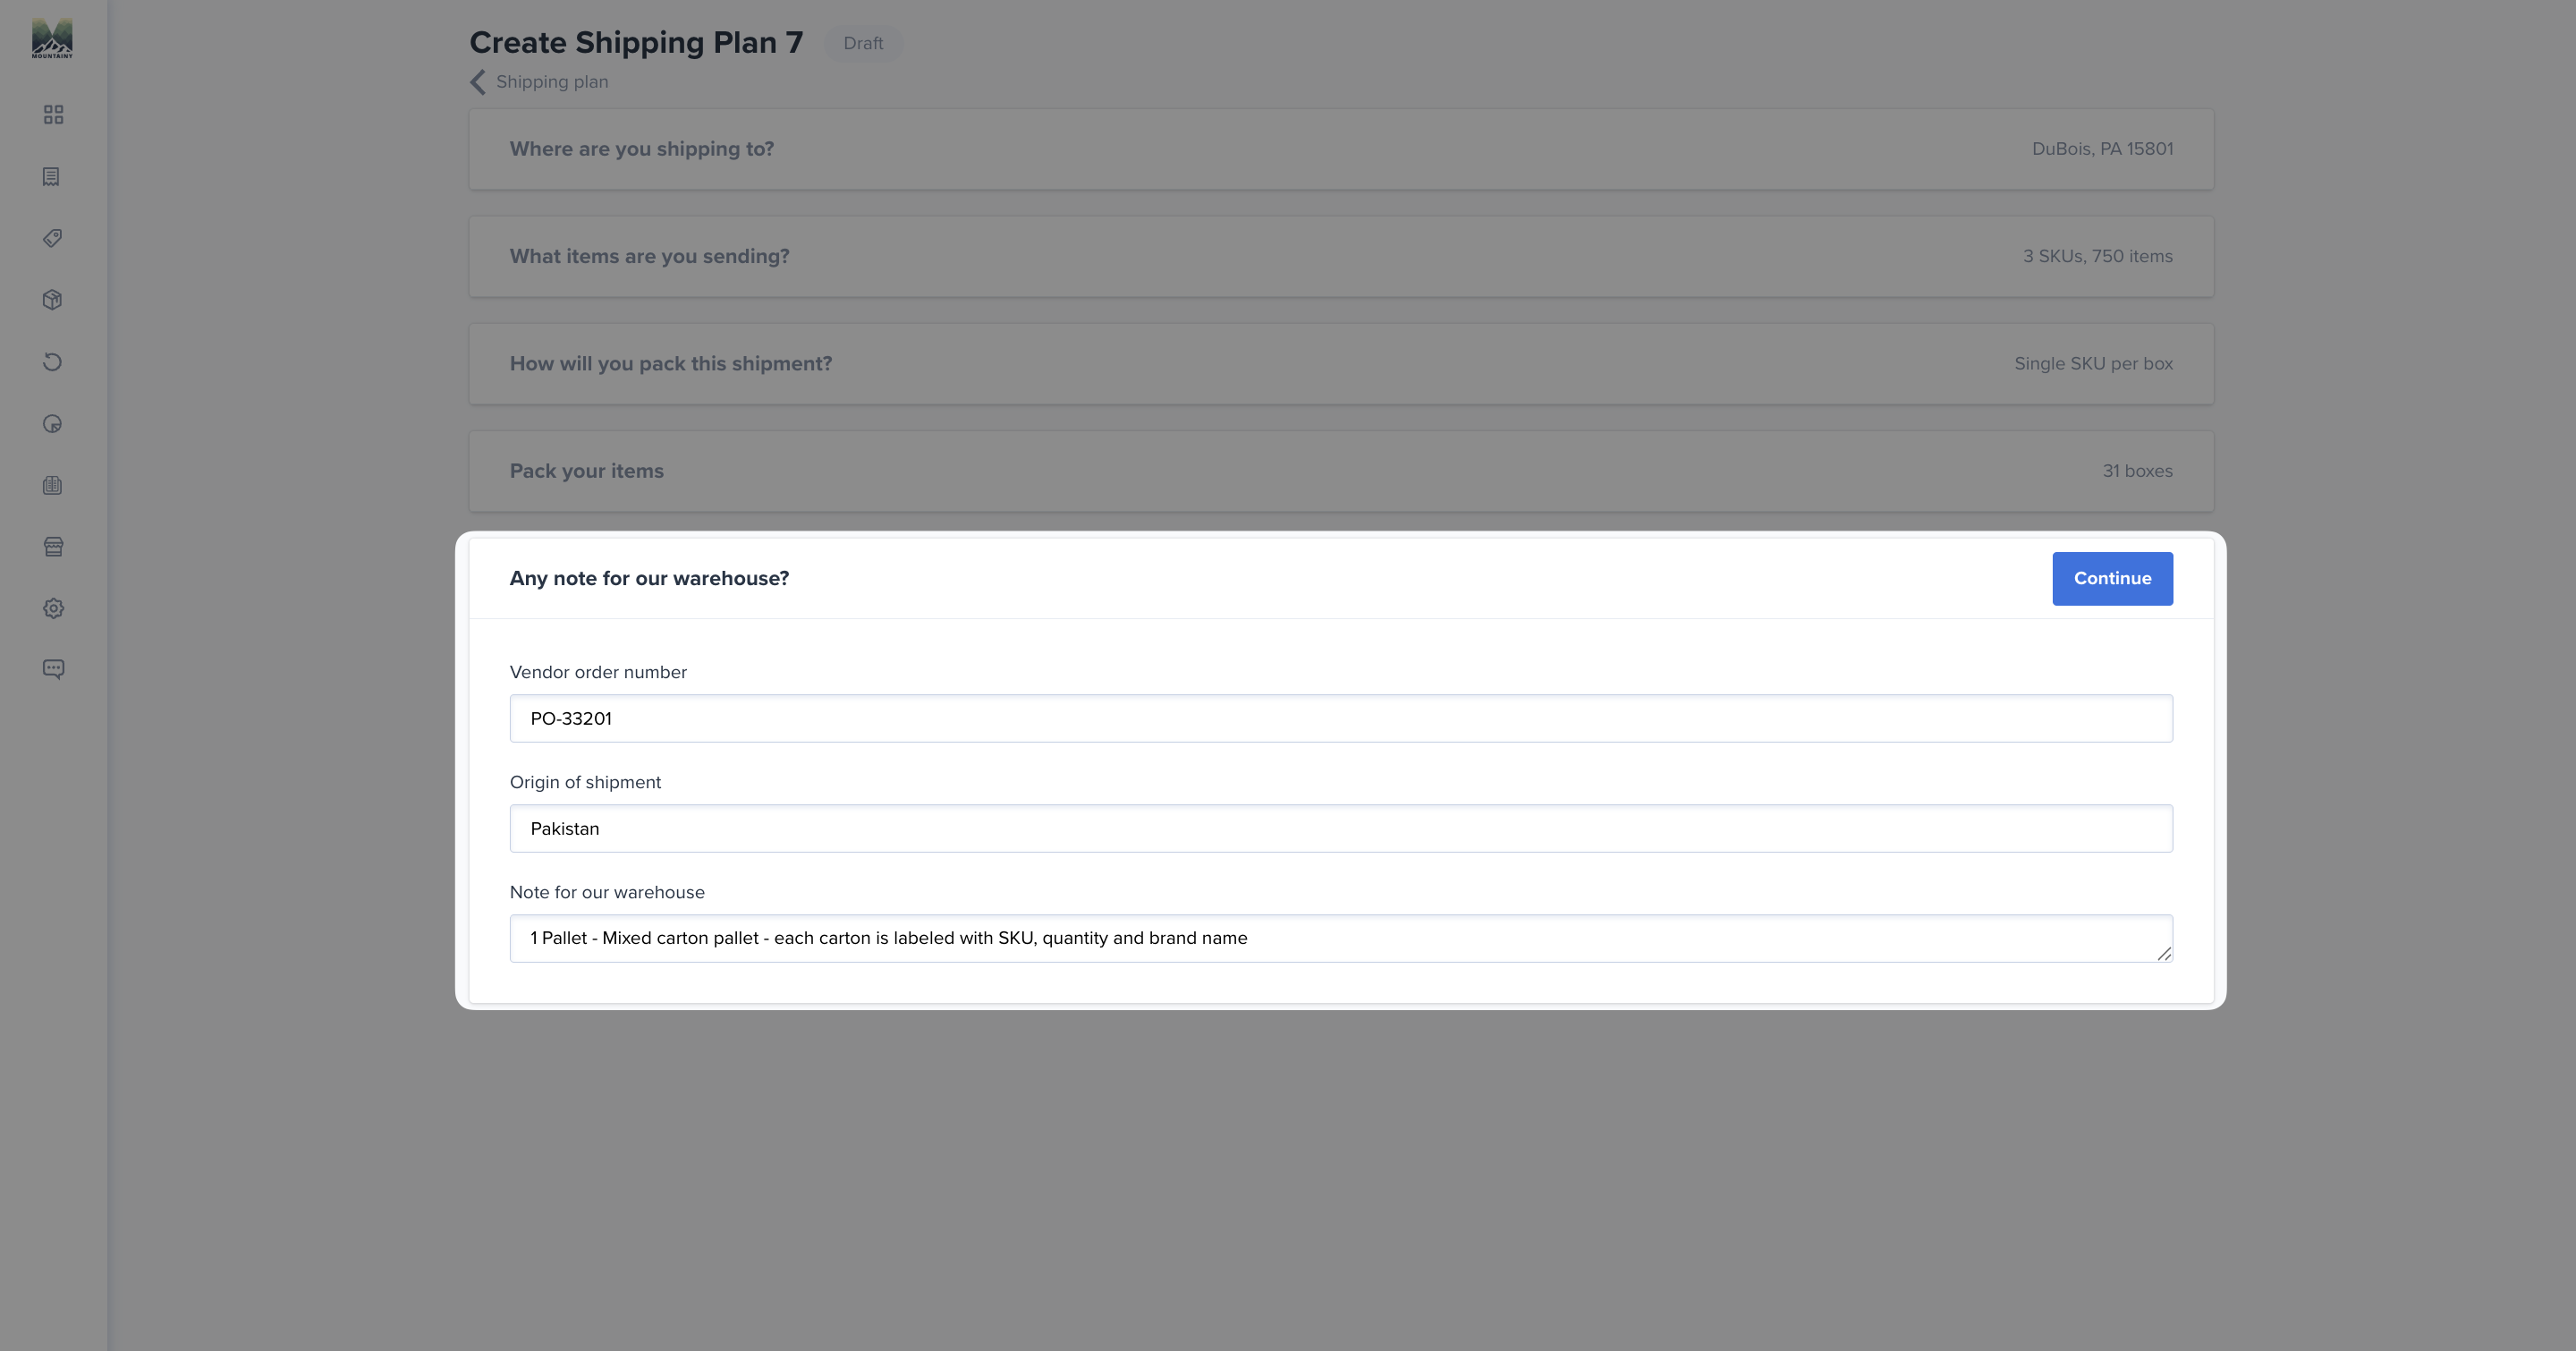
While optional, adding relevant notes is strongly recommended when:
The shipment includes mixed master cartons
There are special labeling considerations
The shipment is palletized in a non-standard way
There are multiple tracking numbers
The delivery requires special coordination
Clear notes allow the receiving team to prepare appropriately and help prevent delays or miscommunication upon arrival. Keep notes concise and operationally relevant.
6: Generate Packing List and Finalize the Shipping Plan
Once all SKUs, quantities, packaging details, and shipment information have been entered, review the Shipping Plan carefully before finalizing.
Generate Packing List
Before completing the Shipping Plan:
Review all details for accuracy.
Confirm SKU counts match physical shipment quantities.
Ensure packaging details align with how the shipment is boxed or palletized.
After verification, generate the Packing List within the portal.
Here’s the properly formatted section:
7: Rename the Shipping Plan, Update Expected Date, and Add Tracking Numbers
After creating your Shipping Plan, you will be redirected to the PO details page.
From here, complete the following actions:
7A: Rename the Shipping Plan (If Needed)
At the top of the page, locate the Shipping Plan / PO name.
Click the pencil icon next to the name.
Edit the PO name if necessary (for example, to match your vendor reference or internal PO number).
Save your changes.
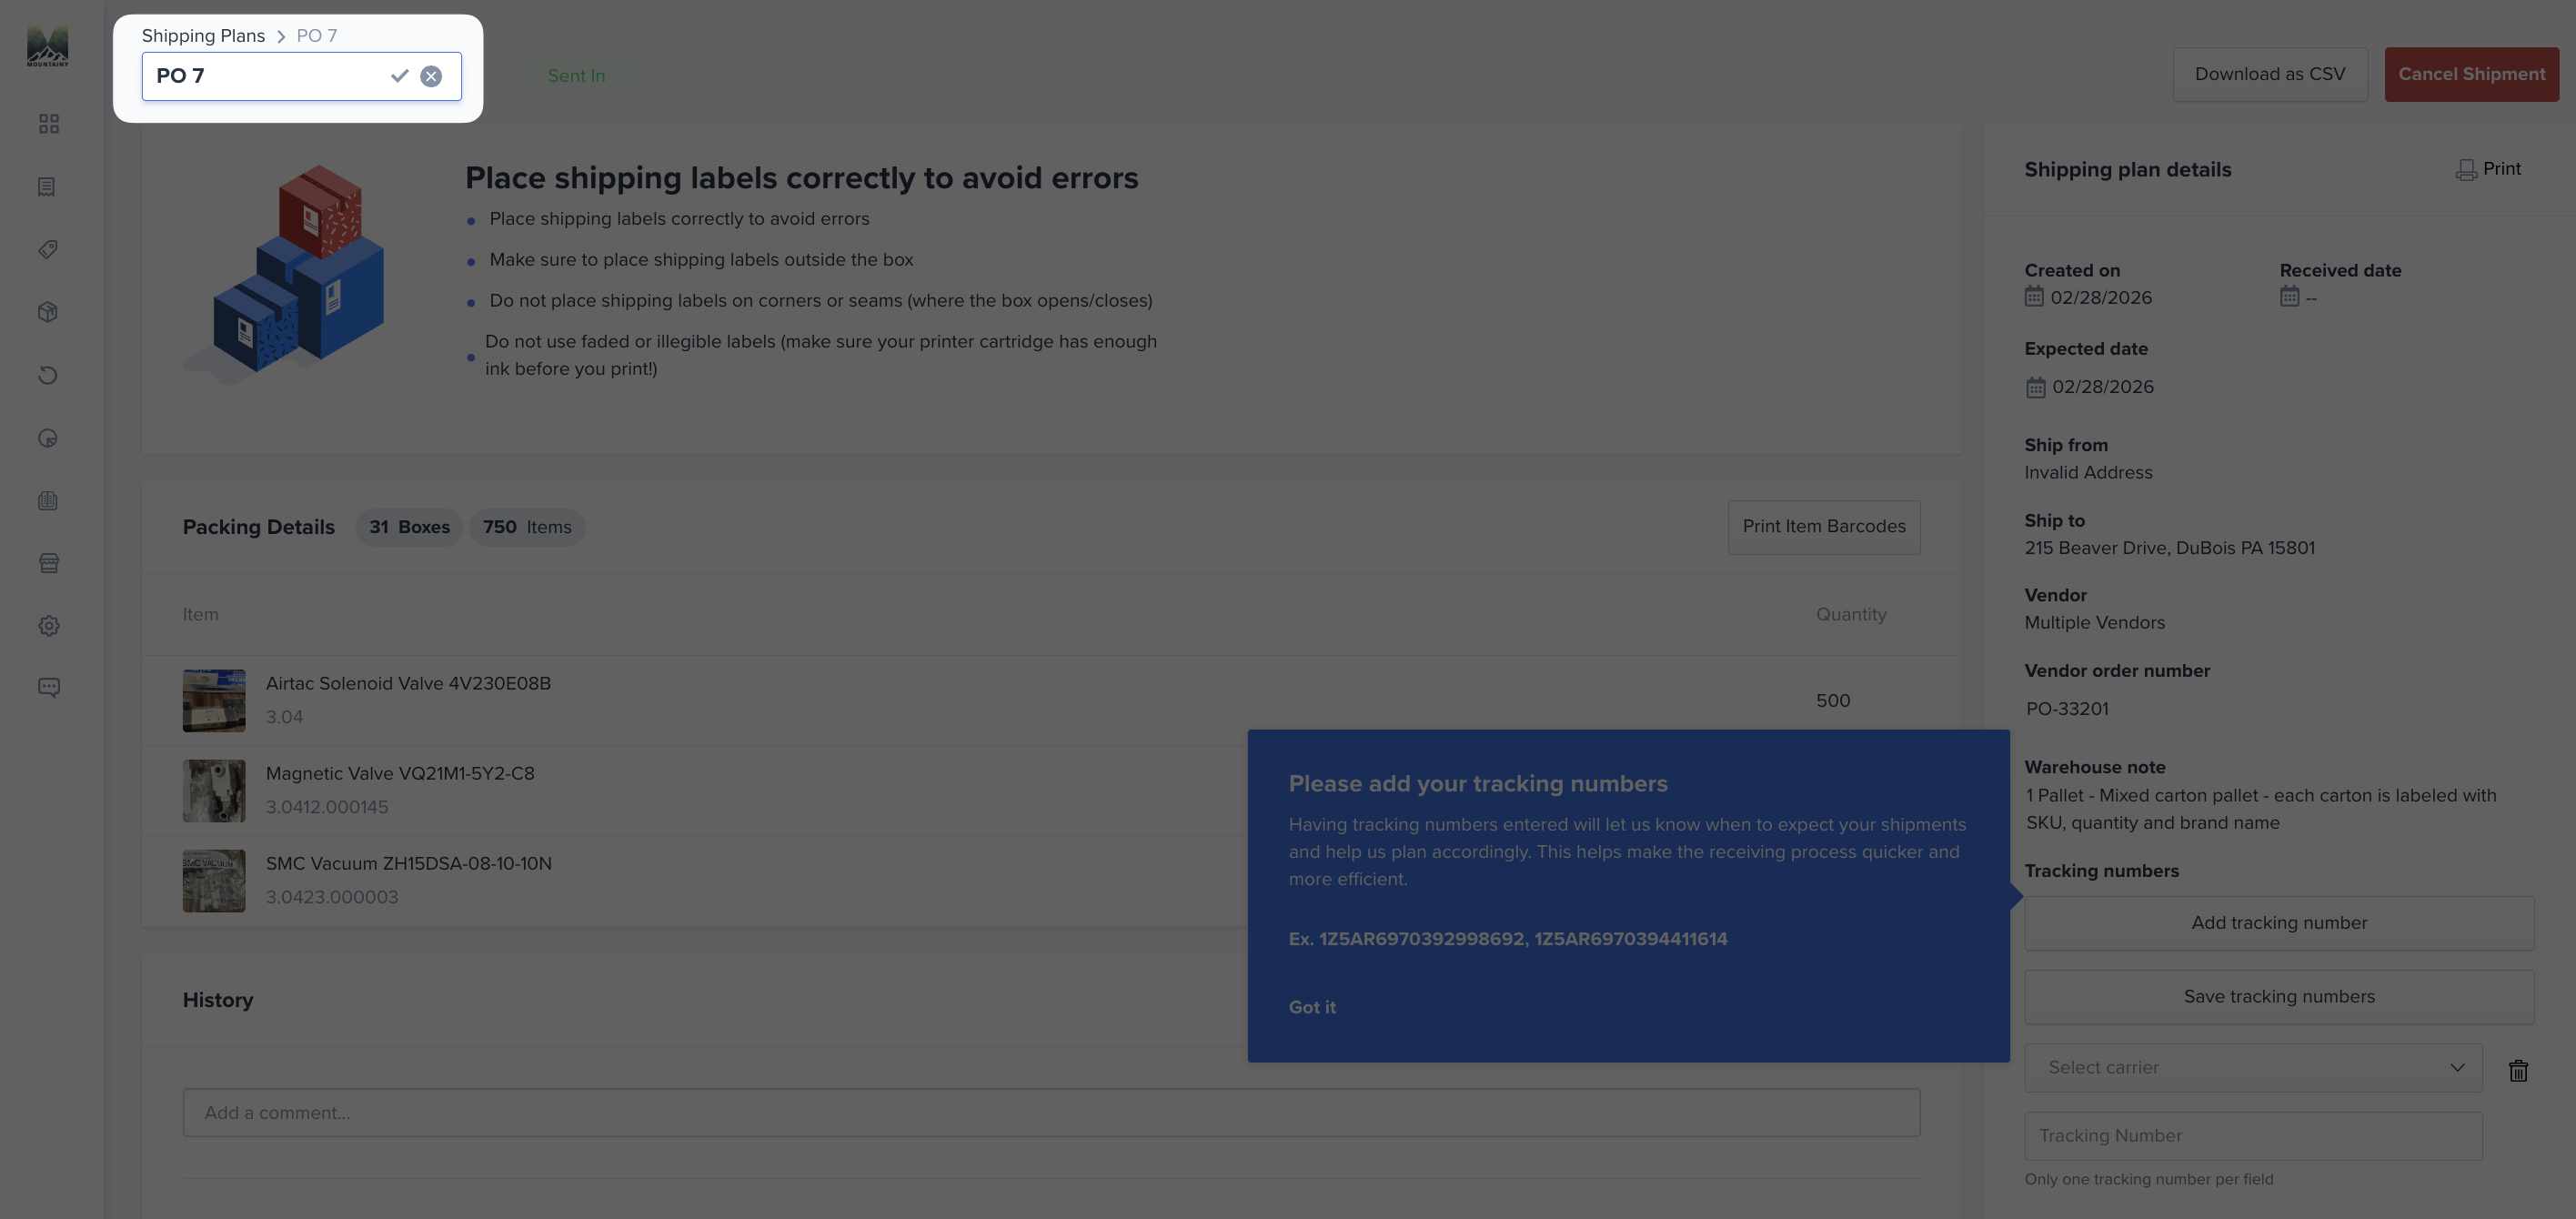
Using a clear and consistent naming convention helps with internal tracking and communication.
7B: Update the Expected Delivery Date
On the right-hand side of the screen, locate the Expected Date field.
Update the expected delivery date to reflect when you realistically anticipate the shipment will arrive at Mountainy.
If the shipment is delayed or accelerated, update this date accordingly.
Accurate expected dates allow the receiving team to plan labor and dock scheduling properly.
7C: Add Tracking Numbers (Required)
Tracking numbers must be added before inventory arrives.
Under the Tracking Numbers section:
Select the appropriate carrier.
Enter each tracking number individually.
Click Save tracking numbers.
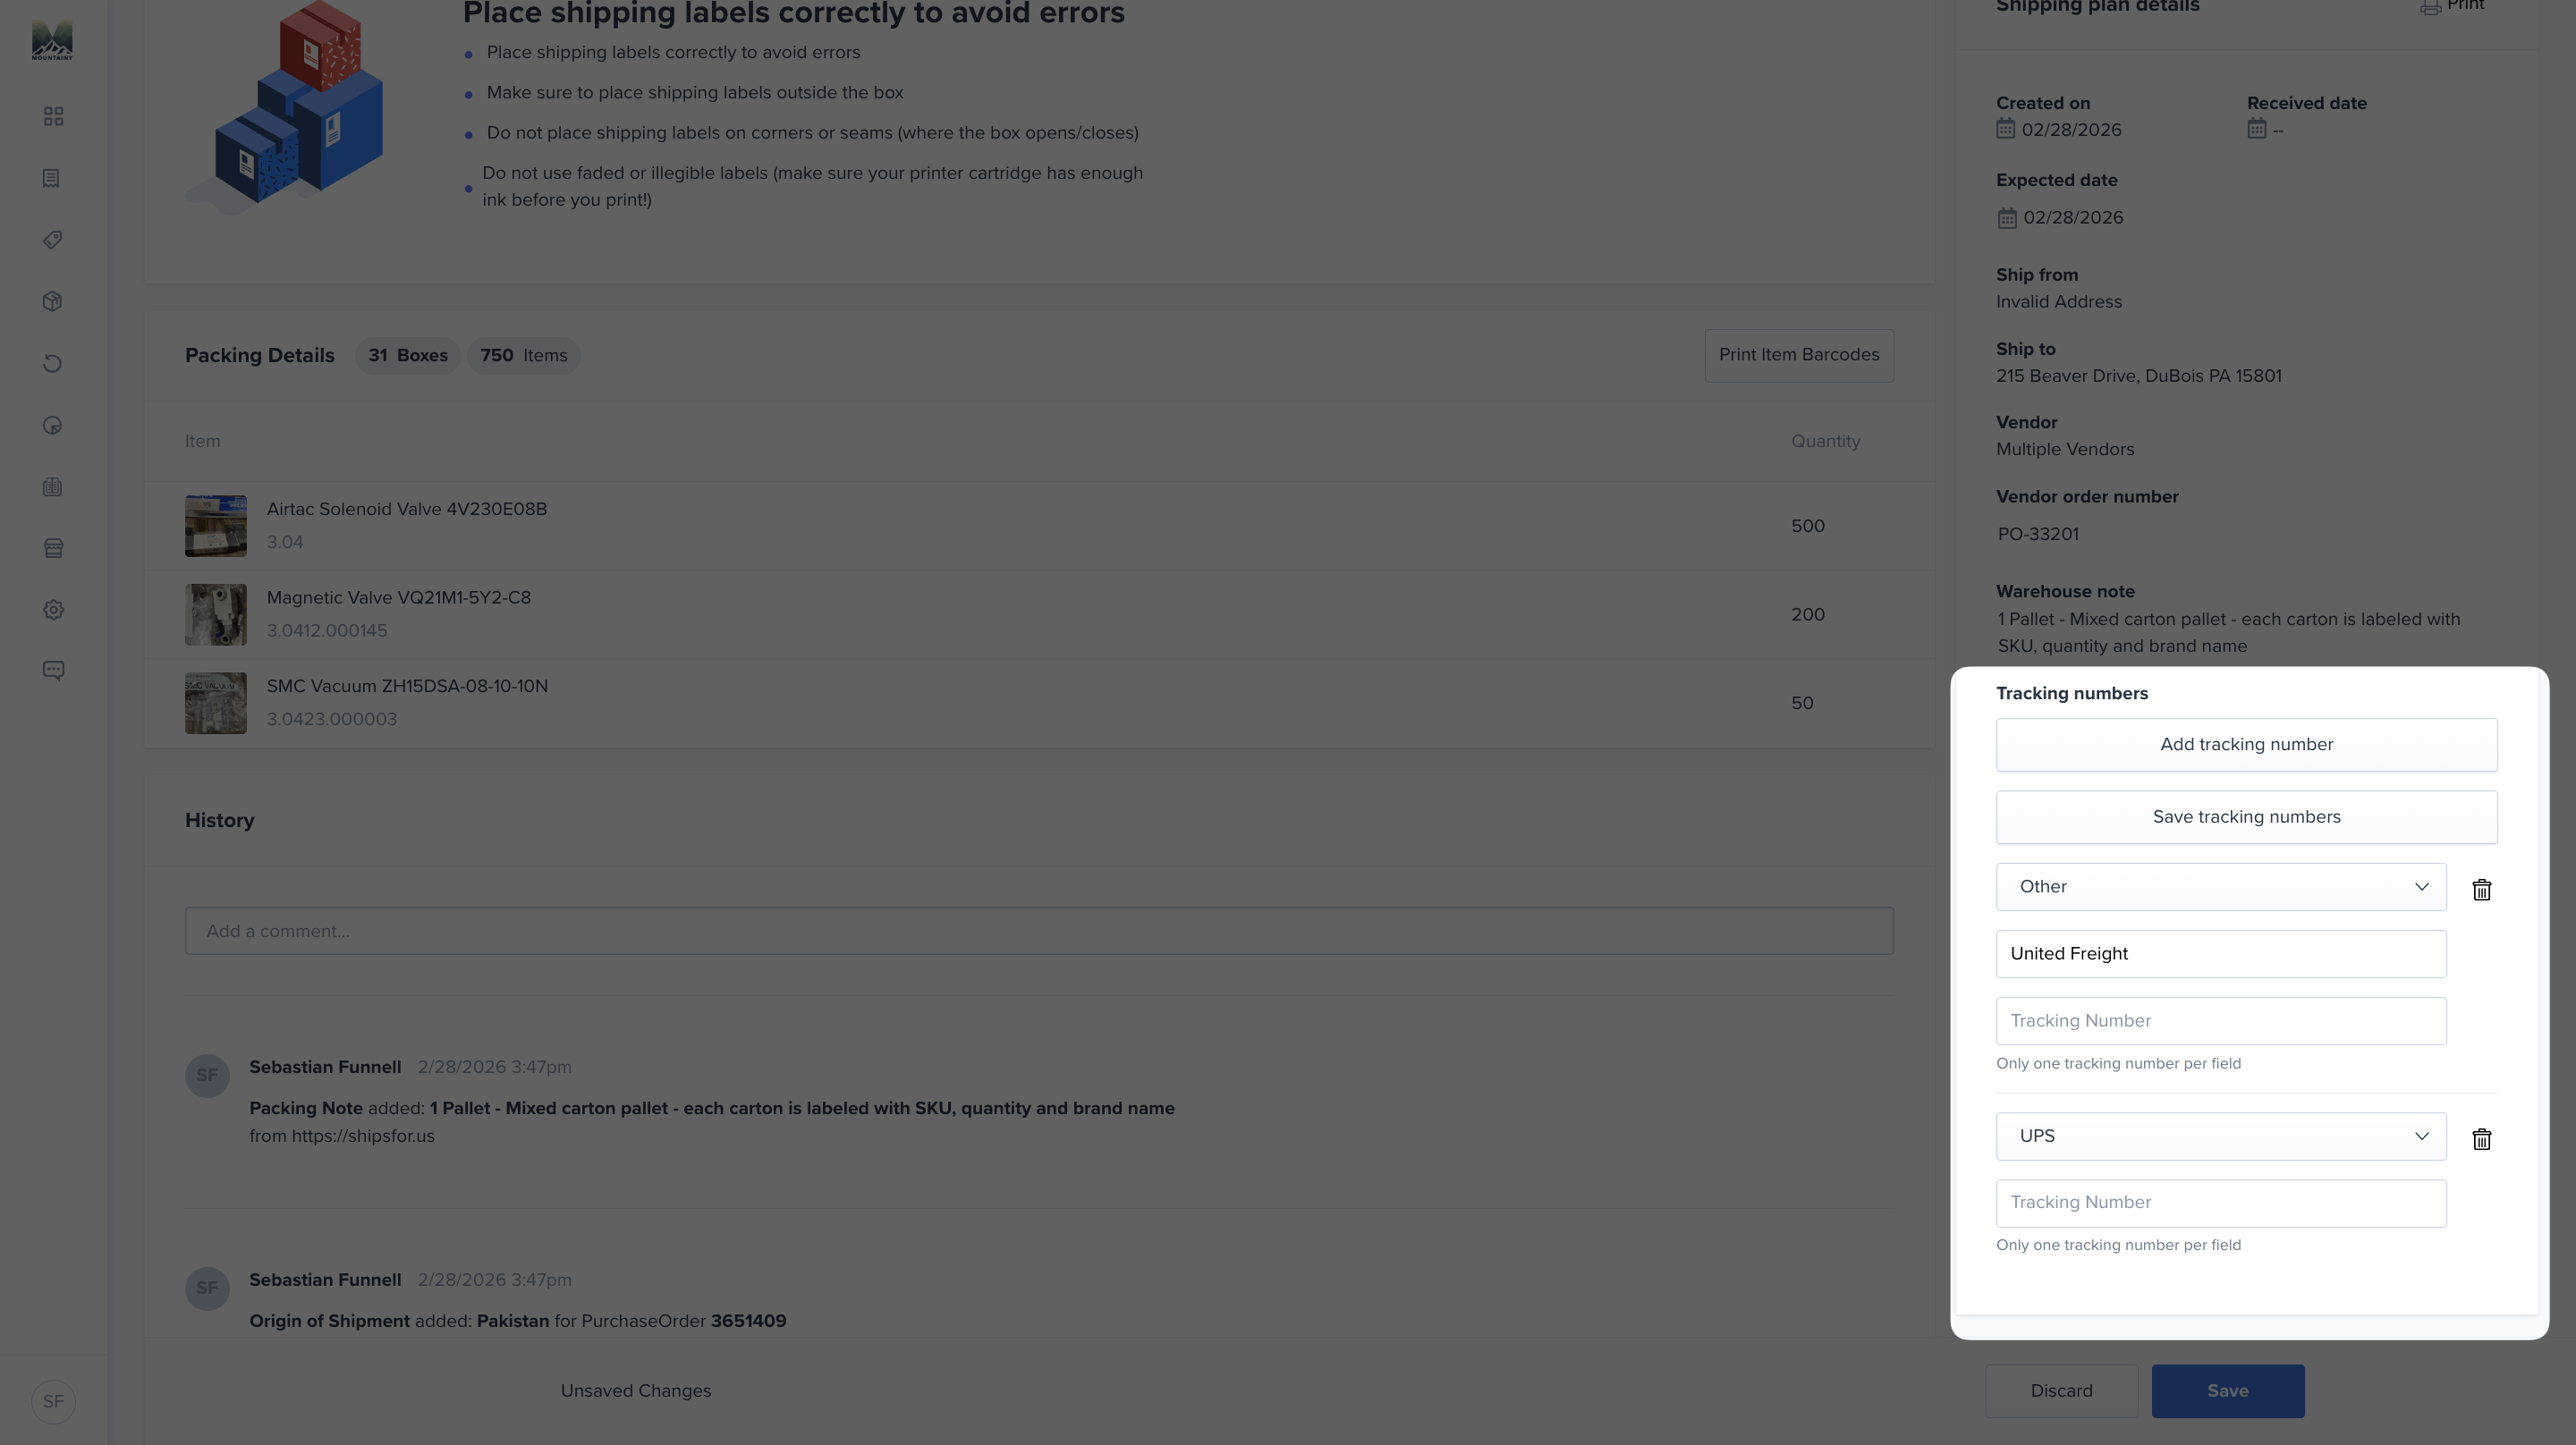
Only one tracking number should be entered per field.
You’re All Set!
Once your Shipping Plan is submitted, tracking numbers are added, and your expected delivery date is updated, your inbound shipment is properly prepared for receiving.
Thank you for taking the time to complete each step accurately — this attention to detail helps ensure fast, efficient, and error-free receiving. Happy scaling 🚀
Here’s a clean closing section you can add to the bottom of the article:
Need Assistance?
If you encounter any issues while creating your Shipping Plan or updating tracking details, please reach out to the Mountainy team in Slack.
Providing clear communication — especially around delivery changes or quantity updates — helps us ensure a smooth receiving process and avoid delays.
We’re here to help.